
Image Dithering
Posted 1/16/2023
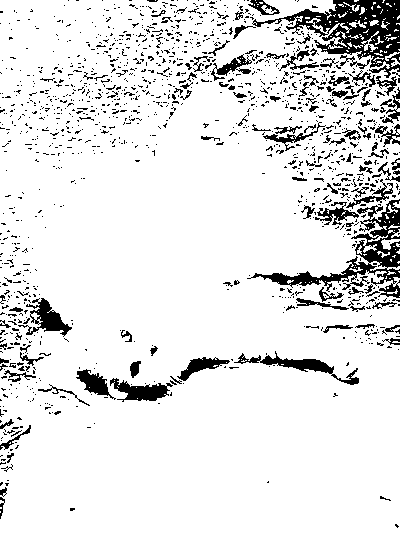
Dithering means intentionally adding noise to a signal to reduce large artifacts like color banding. A classic example is reducing a color image to black and white. Take this magnificent photo of my neighbor’s cat:

To trivially convert this image to black and white we can take each pixel, decide which color it’s closest to, and set it to that:
1
2
3
4
5
6
7
8
9
10
11
12
13
14
15
#!/usr/bin/env python3
from PIL import Image
import numpy as np

# Load image as grayscale
img = Image.open("kacie_color.png").convert("L")
pixels = np.array(img)
for y, row in enumerate(pixels):
    for x,col in enumerate(row):
        if( pixels[y,x] >= 127 ):
            pixels[y,x] = 255
        else:
            pixels[y,x] = 0
bw = Image.fromarray(pixels)
bw.save("kacie_bw.png")
But the result is not very satisfying:
The cat is white. Every pixel will be closer to white than black, and we lose the whole cat except the eyes and nose, along with most of the background detail. But we can do better! What if we set the density of black pixels based on the brightness of a region? That is, black regions will receive all black pixels, white regions all white, but something that should be a mid-gray will get closer to a checkerboard of black and white pixels to approximate the correct brightness.
One particularly satisfying way to approach this regional checkerboarding is called error diffusion. For every pixel, when we set it to black or white, we record how far off the original color is from the new one. Then we adjust the color of the adjacent pixels based on this error. For example, if we set a gray pixel to black, then we record that we’ve made an error by making this pixel darker than it should be, and we’ll brighten the surrounding pixels we haven’t evaluated yet to make them more likely to be set to white. Similarly, if we round a gray pixel up to white, then we darken the nearby pixels to make them more likely to be rounded down to black.
In Floyd-Steinberg dithering we process pixels left to right, top to bottom, and propagate the error of each pixel to its neighbors with the following distribution:
That is, pass on 7/16 of the error to the pixel right of the one we’re examining. Pass on 5/16 of the error to the pixel below, and a little to the two diagonals we haven’t examined yet. We can implement Floyd-Steinberg dithering as follows:
1
2
3
4
5
6
7
8
9
10
11
12
13
14
15
16
17
18
19
20
21
22
23
24
25
26
def getClosest(color):
    if( color >= 127 ):
        return 255 # White
    return 0 # Black

def setAdjacent(pixels, y, x, error):
    (rows,cols) = pixels.shape[0:2]
    if( y >= rows or x >= cols ):
        return # Don't run past edge of image
    pixels[y,x] += error

# Load image as grayscale
img = Image.open("kacie_color.png").convert("L")
pixels = np.array(img)
for y,row in enumerate(pixels):
    for x,col in enumerate(row):
        old = pixels[y,x]
        new = getClosest(old)
        pixels[y,x] = new
        quant_error = old - new
        setAdjacent(pixels, y,   x+1, quant_error*(7/16))
        setAdjacent(pixels, y+1, x-1, quant_error*(3/16))
        setAdjacent(pixels, y+1, x,   quant_error*(5/16))
        setAdjacent(pixels, y+1, x+1, quant_error*(1/16))
dithered = Image.fromarray(pixels)
dithered.save("kacie_dithered_fs.png")
The results are a stunning improvement:
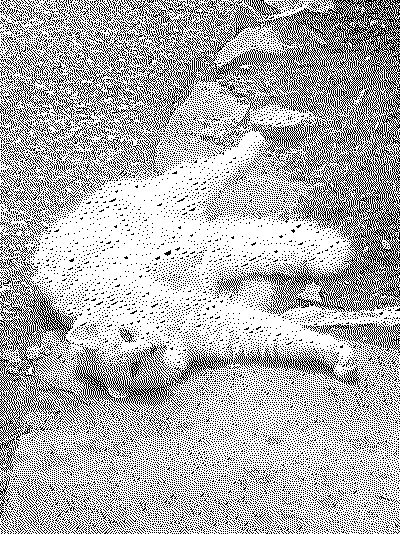
We’ve got the whole cat, ruffles on her fur, the asphalt and wood chips, details on rocks, gradients within shadows, the works! But what are those big black flecks across the cat’s fur? These flecks of “snow” impact the whole image, but they don’t stand out much on the background where we alternate between black and white pixels frequently. On the cat, even small errors setting near-white fur to white pixels build up, and we periodically set a clump of pixels to black.
We can try to reduce this snow by fiddling with the error propagation matrix. Rather than passing all of the error on to adjacent pixels, and mostly to the pixel to the right and below, what if we ‘discount’ the error, only passing on 75% of it? This is the diffusion matrix used in Atkinson dithering:
The code hardly needs a change:
1
2
3
4
5
6
7
8
9
10
11
12
13
14
15
16
img = Image.open("kacie_color.png").convert("L")
pixels = np.array(img)
for y,row in enumerate(pixels):
    for x,col in enumerate(row):
        old = pixels[y,x]
        new = getClosest(old)
        pixels[y,x] = new
        quant_error = old - new
        setAdjacent(pixels, y,   x+1, quant_error*(1/8))
        setAdjacent(pixels, y,   x+2, quant_error*(1/8))
        setAdjacent(pixels, y+1, x+1, quant_error*(1/8))
        setAdjacent(pixels, y+1, x,   quant_error*(1/8))
        setAdjacent(pixels, y+1, x-1, quant_error*(1/8))
        setAdjacent(pixels, y+2, x,   quant_error*(1/8))
dithered = Image.fromarray(pixels)
dithered.save("kacie_dithered_at.png")
And the snow vanishes:
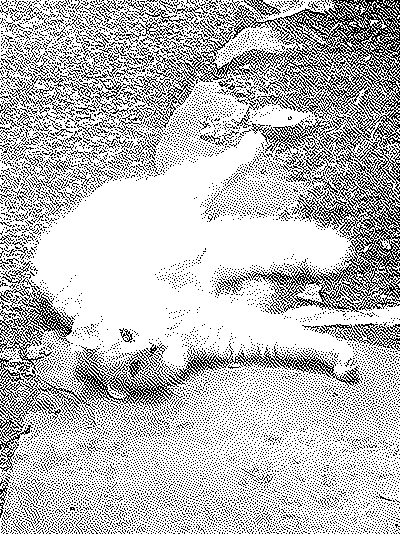
This is a lot more pleasing to the eye, but it’s important to note that the change isn’t free: if you look closely, we’ve lost some detail on the cat’s fur, particularly where the edges of her legs and tail have been ‘washed out.’ After all, we’re now ignoring some of the error caused by our black and white conversion, so we’re no longer compensating for all our mistakes in nearby pixels. This is most noticeable in bright and dark areas where the errors are small.
Closing Thoughts
I really like this idea of adding noise and propagating errors to reduce overall error. It’s a little counter-intuitive; by artificially brightening or darkening a pixel, we’re making an objectively worse local choice when converting a pixel to black or white. Globally, however, this preserves much more of the original structure and detail. This type of error diffusion is most often used in digital signal processing of images, video, and audio, but I am curious whether it has good applications in more distant domains.
If you enjoyed this post and want to read more about mucking with images and color, you may enjoy reading my post on color filter array forensics.